Best Ruler Stop For Repeat Measurements (2026)
About the author
The one-mark mistake that ruins a batch cut
You measure, mark, and cut the first piece perfectly. Then you “match it” for the next five parts, but the last one ends up just a hair short.
It’s rarely a dramatic error. Instead, it’s tiny variation from re-hooking a tape, reading a line, or bumping your square.
That’s why the best ruler stop for repeat measurements matters. You set a distance once, lock it, and then repeat the same measurement fast without re-measuring every time.
This guide covers the best ruler stop for repeat measurements so you can batch out cabinet parts, shelf pin layouts, hinge offsets, and hardware locations with less fuss.
Think of it as a “physical memory” for a dimension. It’s especially helpful when you work off a steel rule, combination square rule, or a T-track setup.
Disclosure: As an Amazon Associate, ToolLayout may earn from qualifying purchases. This doesn’t change what we recommend.
This page compares 5 proven ruler stop styles for 2026. It focuses on real shop tasks where repeatability matters, so your marks stay consistent from part to part:
- Repeatable offsets for marking and scribing
- Batch layout for holes, hardware, and trim lengths
- Beginner-friendly setups that don’t slip mid-job
If you want the measuring-tool basics first, start at Tape Measures & Rules hub
Best ruler stop for repeat measurements (2026): Top 5 Picks
| Image | Product | Best for | Key feature | View on Amazon |
|---|---|---|---|---|
 | Starrett S812-12 Steel Rule Stop | Precision repeat stops on a 12″ rule (305 mm) | Thumbscrew clamp with clean, square stop face | View on Amazon |
 | Incra T-RULESTOP T-Rule Stop | Repeatable marking offsets on Incra T-Rules | Positive-lock stop that registers off the end for repeats | View on Amazon |
 | Woodpeckers Rule Stop | Fast, rigid repeat measurements on Woodpeckers rules | Machined stop block that clamps solid without twisting the rule | View on Amazon |
 | FastCap Story Stick Pro | Cabinet/story-stick layout without re-reading numbers | Sliding stops + write-on scale for repeat marks | View on Amazon |
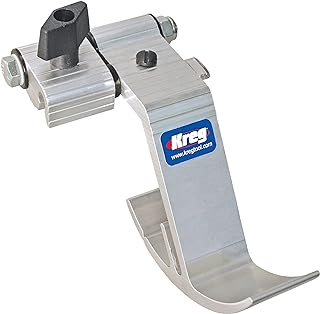 | Kreg KMS7723 Standard Track Stop | Repeat-length cuts with a fence + stop system | Flip-stop design for quick “on/off” repeatability | View on Amazon |
1) Starrett S812-12 Steel Rule Stop — Best overall for repeat measurements on a steel rule
A classic steel-rule stop that turns a normal rule into a repeatable measuring gauge for shop layout.
Watch for: match the stop to the rule thickness/width you actually use, because many stops are sized for common Starrett-style rules.
Best for: repeat offsets, scribing lines, and transferring the same dimension to multiple parts.
What you’ll like: solid clamp pressure with a clean stop face, so the rule doesn’t creep.
🧐 Quick verdict: A dependable, no-drama ruler stop for repeat measurements when you want a real clamp and a square reference.
| Pros ✅ | Cons ⚠️ |
|---|---|
| ✅ Locks down firmly for repeatable offsets | ⚠️ Fit depends on your rule size (check width/thickness) |
| ✅ Clean stop face helps you register consistently | |
| ✅ Great “set once, mark ten parts” workflow |
Why it’s a top pick: For most DIY and woodworking, the best repeat-measurement tool is the one you’ll actually use. This style is quick to set, easy to read, and stable enough to trust when you’re marking multiple parts.
Decision bullets
- Where it shines: marking repeated offsets from an edge (hinge screws, cleat locations, trim reveals, hardware setbacks).
- How it repeats accurately: the stop becomes your hard reference, so you’re no longer re-reading a scale on every part.
- Technique note: keep the rule flat to the face, then pull the stop snug to the edge before you mark.
- Beginner-friendly: yes, because it reduces steps (measure once, then just register + mark).
- Best for: repeatable marking with a steel rule when you want simple, reliable results.
Shop tip: If you’re doing lots of repeats, use a marking knife or a sharp pencil. Also, keep the stop pressed the same way each time, so you don’t “float” it.
2) Incra T-RULESTOP T-Rule Stop — Best for repeatable marking on Incra T-Rules
A purpose-built stop for Incra T-Rules when you want quick repeats without fiddling with a clamp every time.
Watch for: it’s designed around Incra’s rule profile, so double-check compatibility with your exact T-Rule.
Best for: repeated offsets and layout work where your T-rule is your main measuring tool.
What you’ll like: positive stop action that makes “same measurement again” quick and consistent.
🧐 Quick verdict: The cleanest repeat workflow if you already live on an Incra T-Rule for layout.
| Pros ✅ | Cons ⚠️ |
|---|---|
| ✅ Very fast for repeat marks once set | ⚠️ Not universal—best for Incra T-Rules |
| ✅ Keeps your reference consistent on batch layout | |
| ✅ Great for cabinet and hardware marking routines |
If you already use an Incra T-Rule for layout, a matched stop is a smart upgrade. You’re not trying to make a generic clamp fit. Instead, you’re using a stop designed to register and repeat on that rule system.
Why it’s a top pick: It’s fast. Repeat work is all about reducing steps, so you also reduce chances to misread the scale.
Decision bullets
- Compatibility: best if you’re committed to the Incra T-Rule ecosystem for measuring and marking.
- How it repeats: set it once, then register the stop to your reference edge for each part.
- Best use cases: repeated setbacks for drawer pulls, hinge plates, shelf standards, and consistent trim reveals.
- Beginner note: repeatability improves the most when you always reference from the same face/edge.
- Best for: fast repeat marking when an Incra rule is already your daily driver.
3) Woodpeckers Rule Stop — Best “set it and trust it” clamp for repeat measurements
A rigid, shop-grade stop that’s built for repeat marking when you don’t want the stop to twist or drift.
Watch for: confirm it matches the specific Woodpeckers rule you plan to use, because the rule profile matters.
Best for: repeat measurements where a slipping stop would ruin the work.
What you’ll like: solid clamp feel and a clean reference face for consistent registration.
🧐 Quick verdict: A strong choice when you want a ruler stop that feels locked and stays put during a batch.
| Pros ✅ | Cons ⚠️ |
|---|---|
| ✅ Very rigid clamp for repeatable results | ⚠️ Best when paired with its matching rule system |
| ✅ Easy to register consistently on an edge | |
| ✅ Great for “measure once, mark many” work |
If you’re doing careful layout—like consistent handle offsets, repeated hole locations, or story-stick style marking—a rigid stop is worth it. The whole point is simple: the stop becomes your reference, not your eyeballs.
Why it’s a top pick: Repeat work rewards rigidity. A stop that clamps square and doesn’t rotate on the rule is often the difference between “pretty close” and “same every time.”
Decision bullets
- Best use cases: cabinet hardware layouts, shelf standard offsets, repeated scribe lines, and template-style marking.
- How it repeats: lock the stop, then use the stop face as your physical reference for every part.
- Accuracy tip: always “pull” the stop against the same reference edge direction before marking.
- Ruler stop for repeat measurements for beginners: great, because it reduces opportunities to misread a scale.
- Best for: repeat measurements where you want a clamp that stays tight through a full batch.
Quick win: If you’re marking with a pencil, use a mechanical pencil or a marking knife. That way, line thickness doesn’t become your “error budget.”
4) FastCap Story Stick Pro — Best for cabinet-style story stick layout (no re-measuring)
More of a “layout system” than a single clamp stop, because it’s built to repeat multiple marks quickly.
Watch for: take a minute to set your stops carefully. The payoff is speed and consistency across a whole run.
Best for: cabinet rows, shelf layouts, and repeated hole/feature locations along a length.
What you’ll like: sliding stops + write-on surface, so you can build a repeatable “story” for a project.
🧐 Quick verdict: Best when you want to stop re-reading numbers and start repeating a layout pattern fast.
| Pros ✅ | Cons ⚠️ |
|---|---|
| ✅ Excellent for repeating multiple marks along a length | ⚠️ More “system” than simple—set up takes a minute |
| ✅ Great for cabinet/shelf workflows | ⚠️ Not the same thing as a steel-rule stop block |
| ✅ Helps reduce measuring mistakes on long runs |
If you do cabinet-style work, the “story stick” method is one of the fastest ways to keep parts consistent. Instead of measuring each location, you build a repeatable pattern and transfer it down the line.
Why it’s a top pick: It reduces the most common repeat-measurement failure: re-reading and re-marking slightly differently each time.
Decision bullets
- Best use cases: shelf pin layouts, repeated divider locations, consistent hardware positions, and project “templates” you can reuse.
- How it repeats: stops become your hard references, so you move the stick, not the measurements.
- Technique tip: always index from the same end (label it “REFERENCE END”) to avoid flipping mistakes.
- Beginner-friendly: yes, especially if numbers tend to trip you up during repetitive work.
- Best for: repeatable layout patterns where you need multiple stops, not just one.
Related: If your repeat work starts with a tape measure, see how to choose a tape measure for woodworking and our roundup: best tape measure for woodworking.
5) Kreg KMS7723 Standard Track Stop — Best for repeat-length cuts on a fence/track setup
Not a steel-rule clamp. This is a track/fence stop that’s ideal when “repeat measurement” means repeat-length cuts.
Watch for: stops only repeat if your fence/track is fixed and square, so lock your setup before you start cutting.
Best for: batching identical lengths on a miter saw station or track-style fence.
What you’ll like: flip-stop action makes it fast to switch between “stop on” and “stop out of the way.”
🧐 Quick verdict: Best when repeat measurements are tied to a fence—set once, then cut a whole stack the same length.
| Pros ✅ | Cons ⚠️ |
|---|---|
| ✅ Excellent for repeat-length cuts once your fence is set | ⚠️ Not a handheld ruler stop—different job |
| ✅ Flip-stop is fast for batch workflows | ⚠️ Depends on your track/fence being rigid and square |
| ✅ Great for shop stations and production-style repeats |
When you’re building a miter saw station or a simple cut-to-length fence, a track stop is one of the fastest ways to get repeatability. You’re not measuring each board. Instead, you reference a physical stop.
Why it’s a top pick: For repeated cuts, a fence stop is often the most reliable repeat-measurement method because it removes reading errors. Your job becomes simple: keep the board tight to the fence, tight to the stop, then cut.
Decision bullets
- Best use cases: repeated trim blocks, cabinet stretchers, cleats, and any “cut 12 pieces the same” job.
- How it repeats: the stop sets your length, so your tape measure becomes a setup tool, not a production tool.
- Setup tip: verify one test piece, then don’t touch the stop until the batch is done.
- Best for: repeatable cut lengths when you’re working off a fixed fence/track.
For a step-by-step chooser: ruler stop for repeat measurements buying guide
How we choose
To recommend a ruler stop that actually helps in a home shop, we focus on what changes results. In other words, we look for features that keep your measurement repeatable under real handling.
- Lock strength (a stop that creeps is worse than no stop)
- Reference face quality (square, flat, and easy to register)
- Compatibility reality (rule width/thickness/profile matters)
- Repeat workflow speed (set once, repeat without fiddling)
- Shop use cases (cabinet layout, hardware offsets, trim/cut stations)
Don’t buy the wrong drill guide
Don’t buy this if…
- You’re expecting a ruler stop to fix poor layout habits. You still need a consistent reference face/edge and a clean mark.
- You want one stop to fit every rule you own. Many stops are sized to a specific rule width/thickness or a specific brand profile.
- Your real need is repeat-length cutting at a saw. A handheld rule stop won’t replace a fence stop system.
Buy this if…
- You’re tired of re-measuring the same offset and want the layout to match across multiple parts.
- You want a ruler stop for repeat measurements that makes batch work faster and more consistent.
- You’re a beginner and want fewer “read the line wrong” mistakes during repetitive marking.
Buyer’s guide: how to choose a ruler stop that actually repeats
Two main styles (rule stop vs fence/track stop)
Most “repeat measurement” stops fall into two camps. The right choice depends on where you need repeatability most.
- Steel-rule stop (hand layout)
Best for repeated offsets and marking. You set a dimension on a rule and use the stop face as your reference. - Fence/track stop (cutting station)
Best for repeated cut lengths at a saw station. You set the stop once and reference every board to it.
If you’re not sure which you need, decide whether your “repeat” happens at the marking stage or the cutting stage.
What “repeatable” really means (creep, twist, and registration)
A ruler stop repeats accurately through three things. Miss one, and your marks can drift even if the stop feels tight.
- No creep: it stays locked while you handle the rule and press it to the work.
- No twist: it doesn’t rotate on the rule when you register it to an edge.
- Clean registration: the stop face sits flat to your reference edge/face every time.
Quick accuracy check (1 minute)
- Set the stop to 2″ (51 mm) on a scrap board.
- Make five marks, re-registering the stop each time.
- If the marks spread, the stop is creeping/twisting or you’re changing reference faces—tighten, re-seat, and keep the same reference edge.
Ruler stop for repeat measurements for beginners: the simplest workflow
If you’re new to repeat layout, use this routine. It’s simple, but it prevents most “stacked error” problems.
- Pick a reference face and label it (even on painter’s tape).
- Set the stop once and tighten it.
- Pull the stop snug to the edge, then mark with the same tool each time (knife or sharp pencil).
- Don’t “average” marks—if one looks off, re-register and re-mark.
Sizing & compatibility checks (rule width/thickness/profile)
Before you buy, check these details to avoid the “it doesn’t fit my rule” headache. This matters because many stops are not universal.
- Rule width: common shop rules are 1/2″ and 1″ wide (13 mm and 25 mm). Stops are often sized to one.
- Rule thickness: thin rules can flex, but thick rules may not fit some clamps.
- Profile: some systems (like certain T-rules) need a matched stop designed for that shape.
- What you actually repeat: offsets (hand marking) vs lengths (fence stop). Buy the stop that matches the job.
If you want the full chooser: how to choose a ruler stop for repeat measurements
Troubleshooting table: problem → cause → fix
| Problem you see | Likely cause | Fix that works in a real shop |
|---|---|---|
| Marks vary even though the stop is “tight” | Stop is twisting on the rule; inconsistent registration pressure | Re-seat and re-tighten; pull the stop snug to the edge the same way each time |
| Stop creeps during a batch | Not enough clamp force; oily rule; bumping the stop | Clean the rule, tighten firmly, and avoid using the stop as a handle |
| Repeated marks are consistent but the cut lengths still vary | Cutting method varies (blade kerf, fence not square, inconsistent board registration) | Use a fence/track stop for cutting, keep stock tight to fence, and cut in a batch without moving the stop |
| Stop doesn’t fit your rule | Wrong width/thickness/profile | Measure your rule (width + thickness) and buy a stop designed for that size/system |
| Lines look “off” even when the stop repeats | Thick pencil line; marking angle changes | Use a mechanical pencil or marking knife; keep the rule flat and your marking angle consistent |
| Repeat layout is good, but holes/parts still don’t align | Referencing from different faces/ends | Pick one reference face and one reference end; label them and never flip mid-process |
| Stop face doesn’t sit flush to the edge | Edge is rough/out of square; debris between stop and work | Clean the reference edge, knock off burrs, and re-register on a planed/sanded surface |
| Stop works on short offsets but not longer ones | Rule flex; poor support | Support the rule on the work (or use a wider rule), and avoid pressing sideways while marking |
For a deeper walkthrough: ruler stop for repeat measurements buying guide
Common mistakes and quick wins (shop-pro tips)
Quick wins that instantly improve repeat measurements
- Label your reference face and always measure from it.
- Pull the stop to the edge before marking (don’t push and “float”).
- Use a finer mark (mechanical pencil or knife line) so the stop isn’t more accurate than your mark.
- Batch the work without changing the stop setting.
Common mistakes
- Re-setting the stop multiple times instead of setting once and batching.
- Switching reference edges between parts (the fastest way to stack errors).
- Using the stop as a handle and bumping it out of position.
If your repeat workflow starts with a tape, this helps: how to choose a tape measure for woodworking.
FAQs
1) What’s the best ruler stop for repeat measurements?
For most DIY and woodworking, a steel-rule stop that clamps firmly and registers square to an edge is the most useful choice. It lets you set an offset once and repeat it across a batch without re-reading the scale.
2) Is a ruler stop better than using a tape measure for repeats?
Often, yes. A ruler stop replaces “read and mark” with “register and mark,” so it removes common tape-measure errors (hook variance, parallax, and re-reading). However, for long lengths, a fence stop system is usually better than either.
3) Do ruler stops fit any steel rule?
No. Many are sized to a specific rule width/thickness or a specific brand profile. Measure your rule and confirm the stop is designed for that size/system before buying.
4) What’s the best way to use a ruler stop without stacking errors?
Pick one reference face and one reference end, label them, and never flip parts mid-process. Then set the stop once and batch your marks while the stop stays locked.
5) Are story sticks better than ruler stops?
For repeating multiple locations along a length (like shelf pin runs or hardware patterns), a story stick system can be faster and less error-prone. But for single offsets (like a consistent setback), a simple ruler stop is usually quicker.
6) What’s the best ruler stop for repeat measurements for beginners?
A clamp-style steel-rule stop is beginner-friendly because it reduces steps: set once, then register and mark. The biggest beginner win is keeping the same reference edge/face for every part.
7) Why do my repeat marks still vary?
Most often, the stop is twisting on the rule, the stop isn’t pulled snug to the reference edge the same way each time, or you’re switching reference faces. Re-seat, tighten, and register consistently.
8) Can I use a ruler stop for repeat measurements on power tool setups?
For cutting stations, a fence/track stop is usually the right tool. A handheld ruler stop is best for marking and layout, while a fence stop is best for repeat-length cutting.
9) What pairs well with a ruler stop for cleaner, more consistent layout?
A sharp marking knife or mechanical pencil, a reliable square, and a consistent reference-face habit. If you’re also upgrading your measuring kit, start here: best tape measure for woodworking.
Conclusion: which ruler stop should you buy for repeat measurements?
If you want the most useful first pick, start with a clamp-style steel rule stop like Starrett S812-12 (Pick #1) for fast, repeatable offsets during layout.
If you already use an Incra T-Rule, the Incra T-RULESTOP (Pick #2) is the cleanest matched option for quick repeats.
If you want a rigid “set it and trust it” stop for careful batch work, go with the Woodpeckers Rule Stop (Pick #3).
For cabinet-style layout patterns where you’re repeating multiple locations, the FastCap Story Stick Pro (Pick #4) is hard to beat.
And for repeated cut lengths at a station, the Kreg KMS7723 Standard Track Stop (Pick #5) is the right style of stop for the job.
Next step: use our chooser to match the stop to your workflow: how to choose a ruler stop for repeat measurements.